Atom Frenzy – Lesson 5 – Melting, Freezing, and Boiling
Students will role-play being water molecules (their body being an O atom and outstretched hands the H atoms) and act out the vibration and movement of water molecules in ice, liquid water and water vapour. They will then then view and discuss a range of digital animations showing the heating and cooling of water molecules and investigate melting, freezing and boiling of water, relating this to the shape of the water molecules.
1. Introduction: Review the key learnings from previous lessons and introduce the learning intentions using the Atom Frenzy Lesson 5 PowerPoint.
2. Discussion – What is Temperature? Discuss what temperature is, how thermometers work and how to read them. Explain how we will use these ideas to understand how heat affects states of matter.
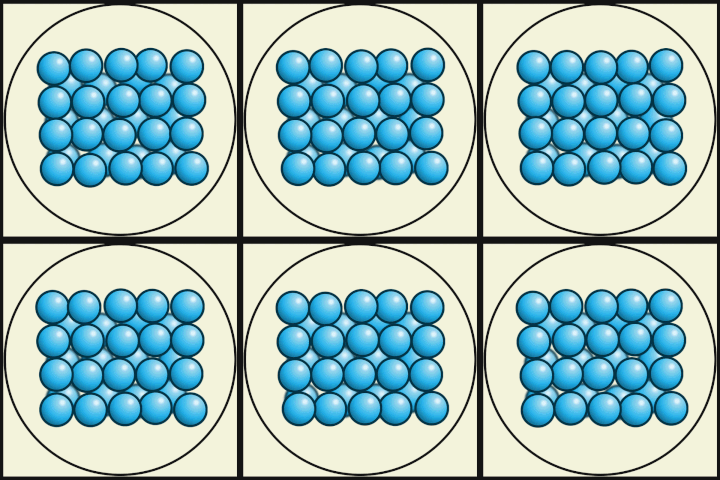
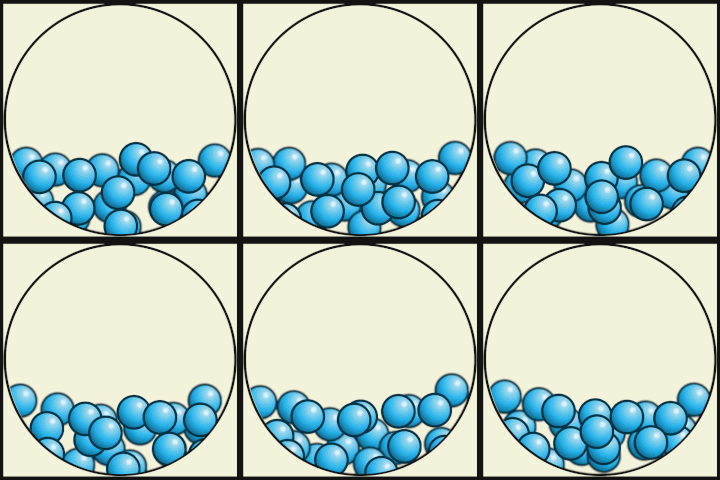
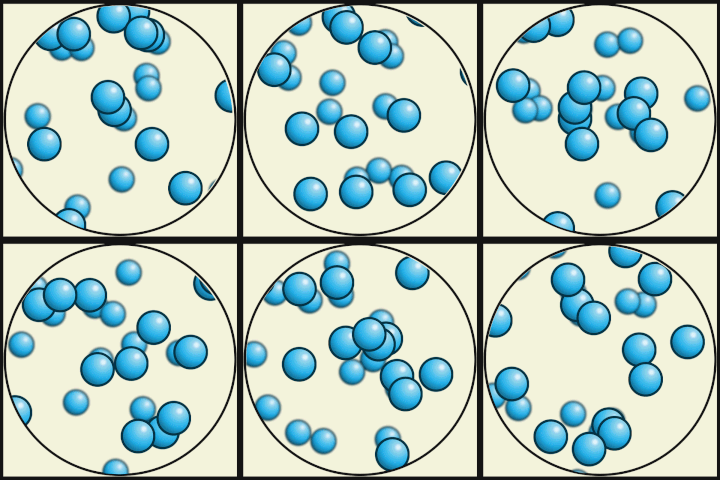
3. Activity (whole class) – Change of State: Whole class acts out the three states of matter. Each person is a molecule. Turn class into a solid, close packed, not jiggling very much. Start jiggling and change to liquid, moving randomly but always in contact. Jiggle more and turn to gas running randomly all over the room.
4. Activity (small groups) – Melting Ice Blocks: groups record the melting of ice cubes in cups at the start of the day, take the temperature regularly, and see it rise past zero only when all the ice has melted.
5. Discussion – Digital Images and Animations: Discuss images and videos which can be used to explain states of matter. Modelling melting and freezing using a digital simulator: the teacher should explain how the following simulator shows a solid which melts: https://phet.colorado.edu/sims/html/states-of-matter/latest/states-of-matter_en.html, https://youtu.be/1Jtw8g795Us
6. Whole Class Demonstration and Discussion – Boiling a glass kettle: (Caution safety!) Why do we get bubbles starting at the bottom? Why do the bubbles go up? What happens to the temperature?
7. Discussion – Arrangement of Water Molecules: Using toy molecules and pictures, discuss how water molecules are arranged in each state of matter and the differences between each state.
8. Review and introduce lesson 6
Students will:
- know that heat is the energy of moving and vibrating atoms and molecules
- explain that heating causes water molecules to vibrate more, cooling slows the vibration down
- know that water comes as solid (ice), liquid and gas and that adding or removing heat causes the water molecules to change from a solid to liquid to gas and vice versa
-
Prepare about 60 paper plates or cardboard squares with ‘H Atom’ written on each.
- paper plates
- clear plastic cups (or clear reusable tumblers)
- thermometers
- timers
- rope (10 – 12 m)
- Electric kettle, preferably see through (glass-walled)
Review the key learnings so far from Lessons 1 to 4 – that is:
- What is everything made of? Everything is made of tiny atoms.
- About how many different types of atoms are there? There are about 100.
- How do molecules form? When two or more atoms combine together to form molecules.
- What holds molecules together? Electric forces of attraction.
- Why do we use models to explain how atoms and molecules are formed and behave? They are too small to see, even with a microscope, so it gives us a way to visualise and image what is going on.
Present the learning intentions for this lesson from the Atom Frenzy Lesson 5 PowerPoint.
In this lesson students will learn how water molecules can be in a solid we call ice, a liquid which flows that we call water, and a gas that we call steam.
They will also learn how to measure temperature, or how hot or cold something is.
- How do we know how hot or cold something is? We measure its temperature.
- What is temperature? A measure of the hotness or coldness of something.
- What do we use to measure temperature? A thermometer.
- Look at your thermometer. What temperatures can it measure? The range of numbers. (It may be necessary to explain negative numbers very briefly as most spirit thermometers measure in the range -10°C to 110°C.)
- How do you know what number the temperature is? Where the red-coloured spirit reaches (or from the digital readout if you have digital thermometers).
Also, show students how to use a thermometer to measure temperature. Stress the need to be careful, particularly if they are using glass thermometers. Now instruct students to have a quick practice. This Worksheet – Measuring Temperature may be a useful resource.
- Don’t touch the end where the bulb of red liquid is stored. Why? The heat from your hand will affect the temperature.
- What is the room temperature today? Each group say what their thermometer tells them the temperature is.
- What do we notice about the results? They are about the same but may vary a little – Why? The angle students are reading at, minor differences in the thermometers – these are relatively inexpensive thermometers!
- What temperature is shown on each thermometer on the worksheet? (Check these on the PowerPoint slides)
- One person gently put the bulb of the thermometer in the palm of their hand and gently cover it with the other hand. What did the temperature go up to?
We will use these ideas to help us understand what happens when a substance like water goes from solid ice to liquid water.
- What do we call this? Melting.
First, the whole class forms a solid and warms up until it begins to melt
Whole class ice cube. The students are all water molecules! First they have to form a crystal of ice.
Students squeeze close together in neat rows in a square at one side of the room. They have some heat so they can jiggle their bodies but not so much that their feet move. How hot can they get (more jiggling) before someone moves their feet… that is the temperature where melting begins.

Second, the whole class melts
More and more must start shuffling around randomly but still tightly squeezed together… now they are a drop of water.
Third, the whole class evaporates
The students must now turn into gas. Gas molecules fill all the space in a container. One at a time students must break free of the droplet and run across the room in random directions, turning around when they reach walls, or tables, bouncing back and forth. This is best done in an empty classroom or outdoor area.
Finally, the teacher switches on the deep freeze
The class slowly regroups first into a liquid and then cools into a cold crystal of ice.
Ask students to find some real ice crystals on google and show everyone: they are beautiful!
We recommend viewing the activity video on the right before reading the detailed activity instructions below.
This activity can need regular measurements over time depending on the weather and the amount of ice. The activity will take about four hours so should be performed when students can come back to it over the course of the day.
Working in groups, students collect a clear plastic cup (or clear reusable tumbler or glass) of ice cubes.
Students place their thermometer into the ice cubes and take the temperature.
Ask students to again take the temperature at convenient time intervals and write down what they see happening to the cup of ice cubes.
Continue taking the temperature until the water starts to warm and nearly reaches room temperature (say 20 °C).
This may be a good opportunity to introduce dot plots to students. In their groups or as a class, guide students in drawing a temperature vs time dot plot of the experiment.
Another way to represent our model of heat energy in atoms and molecules is to use diagrams, digital images or video animations.
The following digital animations show the differences in the way atoms and molecules are arranged in solids, liquids and gases.


Credit: Julio Miguel A Enriquez and Monica Muñoz (CC BY-SA 4-0)
This idea is simply introduced in Atom Frenzy and elaborated in the Hot Stuff topic.
The PhET States of Matter simulator allows us to explore the effect of adding and removing heat on temperature and the vibration of the water molecules. This simulation is best completed as a whole class activity lead by the teacher after they have practiced. Be sure to select water molecules and change the temperature to about -10°C.
The following 1½-minute video explains how water changes from ice to water to water gas or steam:
We recommend viewing the activity video on the right before reading the detailed activity instructions below. Note be especially careful when handling the hot kettle.
Now that students have seen how solid ice water changes to liquid water and back again, we will explore what happens when a kettle boils.
Ask if anyone has watched a kettle boil very carefully. Let’s do it now as a whole class activity.
- Why am I doing this activity as a class demonstration? Boiling water is dangerous – it burns our skin very easily, making nasty blisters that may become infected.
- We will now put the kettle on. Listen carefully. What do you hear as the kettle heats up? A noise.
- What causes this noise? As water boils it turns into steam which is a gas that takes up much more space than liquid water. This causes the steam to rush out of the kettle as it tries to expand, bubbling and making a noise. (Teacher’s note, there is also a small amount of air dissolved in water – about two tablespoons in a full kettle – which is how fish breathe. As water heats up, the solubility of air decreases, causing the tiny bubbles which appear just as the kettle starts to heat up.)
- Why does electricity make the kettle get hot? Electrons from the electricity supply bash into atoms and make them jiggle more which we know as heat. The jiggling atoms in the metal jiggle the molecules in the water. This jiggling is called phonons which we learn more about in the Hot Stuff module.
Use a thermometer to measure and record the temperature every 30 seconds as the kettle boils. Record these temperatures on a whiteboard.

- Who can describe what happens to the temperature as the water heats up and then boils? The temperature goes up to about 100°C and then levels out.
- What did you see happening inside the kettle?
- Why did this happen?
- What was the temperature when the kettle boiled? About 100°C.
- What caused the bubbles inside the kettle as the temperature got near the boiling temperature? Liquid water turning into gaseous steam.
- Who can describe how the water molecules in the middle of the kettle are arranged and how they move? They are close together but move randomly around.
- Who can describe how the water molecules at the spout of the kettle are arranged and how they move? They are well spaced out and move randomly around.
- What caused the bubbles inside the kettle as the temperature got near the boiling temperature? The water molecules ‘break free’ from one another and want to be well separated.
If there is time, you could re-visit the PhET States of Matter simulation, setting the temperature to 50°C and then increasing the temperature until the water boils.
Now let’s go back to the ‘toy’ water molecules from Lesson 2. Ask groups to place about 12 of them on their desk in the middle of each group. Guide them to arrange the molecules so they form ‘ice’.
- Do they each stay in their own place, or do they wander around? They jiggle a bit but stay in their own place.
- How are they ‘lined up’ in ice? They sort of fit around each other because of their funny shape, each facing the same way… (that is why ice crystals are really beautiful).
- Why do they do this? Because they are not just little balls. They share their electrons and the electron cloud is a bit thicker on one side than the other.
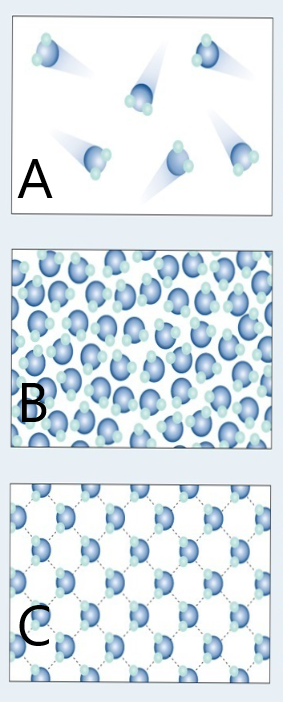
- Does A, B or C represent a model of how water molecules are arranged in ice? C.
- Which one represents water as a gas that we call steam? A.
- Which one shows liquid water? B.
- What are the main differences in the way the water molecules are arranged in ice compared with water? In ice, the molecules stay in their fixed positions whereas in water they mingle or wander around and have random orientations.
- How could this model be improved so that it more accurately shows how water molecules behave in ice, water, and steam? Turn it into a 3-D movie or animation, or even create a virtual reality presentation.
- What are the differences between water as a gas (steam) and water as a liquid? As a gas, the water molecules move very fast, in random directions and they fill the space they are in, whereas as in liquids the molecules stay close to one another but can flow.

Image credit: The University of Waikato Te Whare Wānanga o Waikato – https://www.sciencelearn.org.nz/
In this lesson we used water molecules to learn that heat is the energy of moving and vibrating atoms and molecules, and that heating makes atoms and molecules vibrate more and cooling slows the movement and vibration down. We also acted out being water molecules to show this and used digital models and images to help us understand what happens to atoms and molecules when things get hotter and cool down.
In the next lesson, we will again use water molecules, this time to show what happens when we dissolve sugar in water.
Optional Extension Task
Students move to a space with walls like the assembly hall or an undercover area. The area should not be too big or the chance of students bouncing off each other becomes too small.
Each student walks at a steady speed in random straight lines, bouncing off walls and maybe bouncing (gently!) off each other.
Students count the number of steps between collisions with others. (The number of steps is different every time but the average number of steps depends only on how crowded it is.)
(Depending on the number of students and the size of the room, the average free path might be say 10 steps)
If everyone records the number of steps, we can make a list of the numbers and work out the average.
Now, use boundary ropes attached to chairs to make the space smaller. Repeat the experiment. What happens to average free path? It should get smaller.
Steadily continue to shrink the boundary while should continue moving at the same pace.
The free path will fall to zero but students should try to continue to move at the same speed.
The class becomes a jostling crowd, always in contact.
This represents the effect of pressure on gases.
Water: A compound made when two hydrogen atoms bond with one oxygen atom to form a clear liquid made of H2O molecules.
Ice: Water molecules (H2O) in the solid state.
Water vapour: Water molecules (H2O) in the gaseous state.
Freezing: Liquid water changing into solid water or ice, normally when the temperature is 0°C.
Melting: Solid water or ice changing back to liquid water, normally when the temperature is 0°C.
Boiling: Liquid water changing into water vapour, normally when the temperature is 100°C.
Condensing: Water vapour changing to liquid water, normally when the temperature is 100°C.
Temperature: A measure of how hot or cold something is and is also a measure of how quickly the atoms and molecules are juggling.
Thermometer: An instrument used to measure temperature.
Degrees Celsius (written °C): A unit used to measure temperature.
